So I’ve been throwing out hints over the past month about
something new I’ve been working on. Hopefully, you’ve been able to come up with
some sort of reasonable guess about wood + acrylic paint + wood stain +
polyurethane + wood glue + a sander equaling some sort of wood sculpture. But
if not, I’m telling you outright that I’ve started creating art with wood.
To give you a little background
before I give you a look at what I created, I’ve had this idea in mind for at
least a year, wondering how I could turn the geometry that’s in my head (see
some of my paintings like Bars, Aerial, and Cave Painting) into something big
and physical. Wood seemed like the right medium to translate my ideas into
reality, so I started picking up some of the tools I needed to bridge ideas and
reality. Toward that end, I got a chop saw around Christmas a year ago, but it
wasn’t until recently I decided to go full bore after it – with things like
school and life slowing me down in the interim.
[In case you’re curious, here’re
a few things that spurred me on recently. Building out my Etsy shop made me
explore Etsy a little more to see what else was out there, figure out who my
competition was, and help me get ideas as to what would help me access the
audience I was looking to share my art with. While doing that I found someone
already making some beautiful wood sculpture, not dissimilar to what I’d had in
mind all these months, which was obviously very well received. My first thought
on seeing that was, “What are you waiting for?” Another recent impetus was the
coming art installation at Local Coffee. I realized that that would be a place
where I could showcase something like that effectively that would also be
motivating as I had a deadline to hit to get everything ready.]
So a few weeks back, I made a few
trips to the local home improvement store to pick out some materials that would
fit what I was looking to create, and pick up some other small tools that I
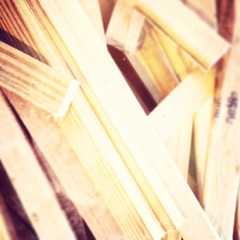
would need to bring it all together. You’ll get a general idea of what those
all are in the pictures below, but just to summarize, my list included various
wood slats of slightly different shapes, sizes, and types (poplar, oak, cedar,
pine), a 1x6 to attach everything to, several different types of wood stain,
wood glue, and a small orbital sander.
Upon getting everything home, and
finally opening up that chop saw that’d been taking up space in my garage, I
started measuring and cutting wood. There was nothing too precise about it,
just making sure that I didn’t cut anything bigger than 4 feet long, as that
might start to get unwieldy. Sanding was the next step, which while simple, was
more time consuming than I’d expected (I guess I didn’t really have any
specific expectations, but sanding all the surfaces of 60 or so 3 foot pieces of
wood isn’t quick).
After that – over the next few nights – I spent time getting
the pieces arranged just so, before I diving into the staining and painting of
each piece. While the staining and painting itself took a few hours, it gave me
enough time to realize – with the help of my much more detail oriented wife – that
I had two problems.
The first issue was that what I was creating was going to be
both heavy and bulky. With the outer dimensions of the piece at 4x4 feet, it wasn’t
exactly compact. Furthermore, while a single wood slat or trim piece might be
relatively light, dozens of them along
with a backing to bring them together was going to be in the 50-60 pounds
range. Ultimately, I made the decision to cut the art into three separate
pieces that could still be hung close enough together to work as one piece.
The second problem was how I was going to join all the
pieces together. I could’ve used wood screws and/or nails, but then there were
the issues of maintaining the integrity of the wood, avoiding pointy edges, and
having to both fill and re-paint/re-stain the screw/nail holes. This was solved
with a little interweb querying. Fact of the day: did you know that wood glue
creates a bond between two pieces of wood that is actually stronger than the
material of the wood itself? The wood will break before the joint. While I was
initially skeptical, after watching a few YouTube videos and experimenting with
some scraps I had around, I discovered that that is absolutely true. I stood on
one of the scrap pieces and tried to pull the other piece(s) off of it and
couldn’t do it.
So, with my major problems resolved and the bulk of the work
done (excluding some touch up painting), the piece was finished [you can see it
in the gallery below]. Although this type of art has definitely presented new
challenges for me, it’s something that I’ll definitely continue to explore.
In one last shameless plug for the upcoming installation,
Bars 2.0 will be debuting at Local Coffee here next week, so come see it in
person and let me know what you think.
(Note - Click on the image below to scroll through the various images and stages of the piece.)